Blog
Kinect-enabled Gigapixel Viewer Part 2: Prepare a Gigapixel image
This is part two of a three part tutorial on how to set up the Kinect, create your own Gigapixel image, and use the Kinect with the Gigapixel viewer. Part 2 focuses on creating your own Gigapixel image; Part 1 focuses on setting up the Kinect, and Part 3 focuses on using the Kinect with a Gigapixel image.
The Gigapixel Viewer allows a user to pan, drag, and zoom on gigapixel images of any variety. The Kinect itself is this amazing space age gadget designed to use depth information from whatever's standing in front of it to make user input available. Instead of touching your screen, touching your mouse, or touching anything, you stand approximately 6 feet away (though this may vary depending on your setup) and move your hands.
And most recently the Mars Curiosity Rover has started transmitting back images after this device of super-tech landed on the red planet in a combination of falling, parachutes, jet engines and a skycrane gently setting it down. It seems only appropriate that we take the images from this interplanetary device and set them up to view them on our natural user interface (NUI) device. This way, when people ask what you're doing while waving your hands around at a big screen, you can say, "It's all right, I'm just moving a camera around to look at Mars," because, you know, we live in the future and that's something we do now.
The first step is to get an image. There's multiple ways to get gigapixel images, the easiest one is to just go to one of NASA's many sites and just download one. They're huge, and easy to find. You don't go to Mars and act all shy about it.
What I'm going to do is take the panorama, which is fairly large to be viewed on its own. If it's not big enough for you, don't worry, the available pictures from NASA are only likely to get larger as currently the panoramas being sent back are made of thumbnails instead of the high-res images.
For those who are new to gigapixel images, a gigapixel image is usually either an extremely large image, or a series of many images that image processing software looks through, cuts up, and then branches out into different folders like a folder tree. As a viewer zooms in and out, it allows the computer to only need to load a small number of moderately sized images instead of working through one massive file of image data. We're going to go with just one of the panoramas for now, but you may try downloading all of the Curiosity's mast images to make a gigapixel image from full-res photos instead of one high-res photo. It sounds crazy, I know, but how much crazier is it than waving your hands around like a wizard to look at the surface of Mars?
To create the gigapixel image now that we've got a large image, I'm going to use a program that's free for Windows called Deep Zoom Composer, developed by the lovely SeaDragon people at Microsoft, and free with Windows. Deep Zoom can output gigapixel images for various formats. What we want is an XML file and a series of branching folders.
Once you have your photo (and this can work with any large photo, or massive series of photos), you can open up Deep Zoom Composer, and start a new project.

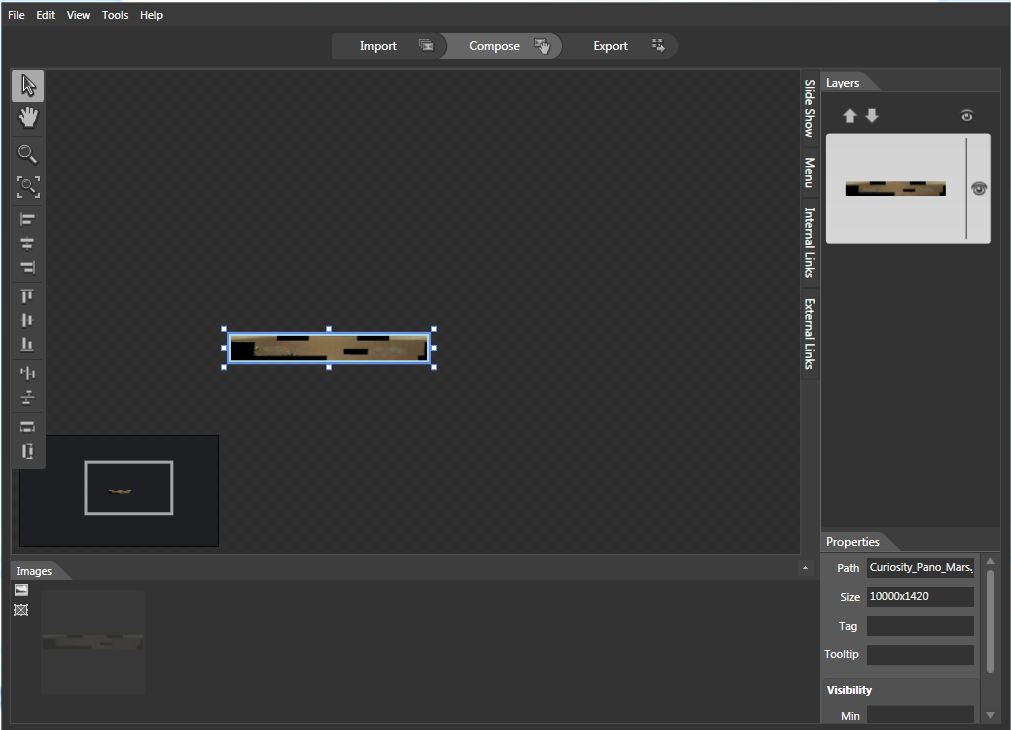
From here, it's fairly easy. The first step is to import the photo by going to the button above the list box at the right and clicking "Add image..." Then you just navigate to where you saved your large panorama, or go about clicking on your whole folder of images. Just to note: Deep Zoom Composer can be finicky with different file types. Some extremely large files it can handle easily, and some other files it just won't accepet. If you're having trouble loading a chosen image or series of images, try saving them in a different file format and then try again.
Now, the next step is either very short or very long. Since I only have one image right now, I'm going to go to "compose", and drag it out onto the screen. A little window in the bottom left shows me where my image is relative to the rest of my composition. But I don't care, because I only have one picture. As you can see though, I have a lot of room to expand if I ever decide to take on all of the Curiosity's high-res images. Since I only have one picture, I'm going to go on to "Export".
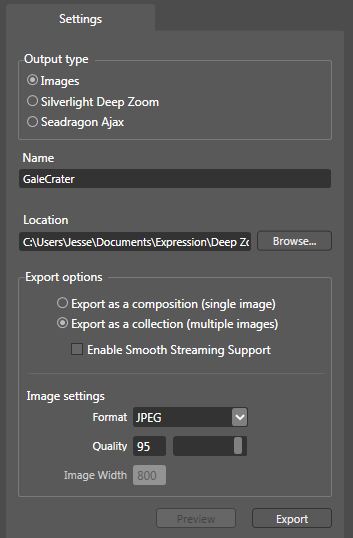
The Export page is fairly simple. Here's the important thing you want to know for using the gigapixel viewer: you want "Images" selected, as this is what's going to give you your XML and branching file structure that the gigapixel viewer likes to work with.
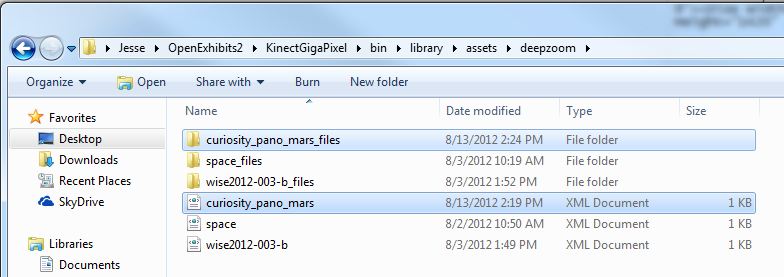
Once you click "Export", you will be asked if you'd like to "Learn More" or view your images folder. Lets look at the images. The first thing you get is this weird folder tucked away on your hard drive with all these files which you may or may not know about. For the gigapixel viewer, we're only concerned with the "dzc_output_images" folder that's highlighted in this picture. Doubleclick on that.
You should now be in a folder with a file, and another folder. The file should be an XML Document, and the folder should have a matching name to it with all your image files. If you bother looking in, you'll just see a bunch of folders labeled with numbers, those are the "levels" of your gigapixel image. You don't need to mess with those.
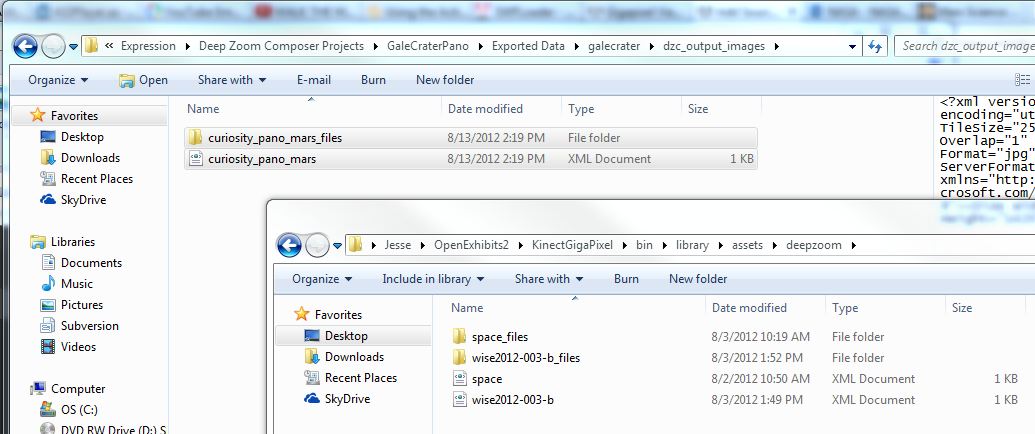
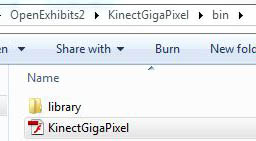
Instead, what you want to do is take your XML file, and its matching folder full of image folders, and paste them into the "bin/library/assets/deepzoom" folder of your KinectGigaPixel folder, wherever you saved that. As you'll notice, there are two already present with your download. Once you paste the XML and the folder in, you'll have a third. The XML file's name is all you need to reference in your CML now to load your new gigapixel image.

Open Exhibits 2.5 Coming October 18, 2012
The Open Exhibits team is excited to announce that the newest version of Open Exhibits will be released on October 18, 2012.
Along with all the great new features and improvements like more efficient gesture processing, improved gesture support, support for custom gesture event naming, and an improved built-in physics engine that were outlined in the original announcement, we'll be including a host of new open components and UI elements from the Open Exhibits team in this release, a small sampling of which follows:
Orb Menu UI Element
Tabbed Container UI Element

Touch Keyboard UI Element
Layout System
There is also new layout system that contains layouts such as Point, Pile, Fan, and List, all of which have the ability to tween into place.
We'll be sending out an email to everyone on the Open Exhibits mailing list when the new version is released.
As always, this new version of the Open Exhibits SDK is free for non-commercial or educational use by museums, nonprofits, schools, and U.S. government agencies; commercial users and developers may purchase GestureWorks, the commercial counterpart to the Open Exhibits SDK.
Kinect Enabled Gigapixel Viewer Part 1: Preparing the Kinect
This is part 1 of a three part tutorial on setting up the Kinect, creating your own Gigapixel image, and using the Kinect with the Gigapixel viewer. Part 1 focuses on setup, Part 2 focuses on creating a Gigapixel image, and Part 3 focuses on using the Kinect.
The Kinect is an amazing new piece of technology for Natural User Interfaces (NUI.) What this means is that the Kinect is great for designing interfaces which basically disappear in front of the user. What most people are familiar with are Graphical User Interfaces (GUI), which have things like buttons, menus, cursors, and icons. The concept of the Kinect is to give a chance for people to break away from those things and command a computer using physical motions or vocal commands without even necessarily touching it, like you're some amazing computer wizard. Like Harry Potter meets Bill Gates.
At OpenExhibits, we have our TUIO Kinect Complete utility which opens up the door to start using the Kinect to interface with the framework instead of a touchscreen. Most recently, I updated the Gigapixel viewer to make sure it worked appropriately with the Kinect, and we have a fresh new package so you can use the Kinect Enabled Gigapixel Viewer after you've installed our TUIO Kinect Complete utility and do what everyone's wanted to do since the dawn of computing: wave your arms wildly at your computer and have it do something.
First thing's first, however. Before you can work with the Kinect, you will need our utility installed, which is included in the Kinect package. To install it, just run the "setup_tuio_kinect_complete-1.0.0.exe" file in the "air" folder with the AIR installer. The drivers used by this utility are open source, meaning you don't have to pay for them ever, but more importantly meaning you cannot have these and the official Microsoft Kinect SDK installed at the same time. So if you've installed the Microsoft Kinect SDK, install these drivers on an alternate computer, or uninstall Microsoft's drivers, or you will be sad.
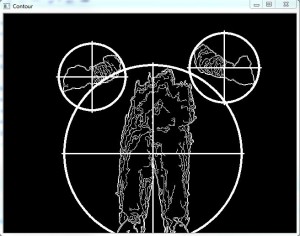
Once you have this installed, you will need to run your "TUIO Kinect Tray" program, which will open up a window named "Contour." If you dance around in front of your Kinect now and look at your screen, you'll notice blobs with crosshairs or other possible markings appearing as you go in and out of the appropriate depths. This program is essentially a "blob tracker." The Kinect works through its two infared sensors, spaced apart much like your eyes, which allow it to measure depth down to the millimeter up to 12 feet (4 meters) away. This program works by taking that depth data and making educated guesses about what depth information in front of it is a person. This is not what's called a "skeletal viewer", which is a Kinect program that interprets educated guesses on a person's entire skeleton. This just tracks blobs, it's very simple.
- The blob tracker
I'll just say for now that you will want your Kinect set up on the edge of whatever you're placing it on, whether it's a desk, table, or shelf. You will want to stand approximately 6 feet away to achieve the ideal depth, though this may vary depending on conditions. I will talk more about the physical use of the Kinect later.
Now that your Kinect is set up and working, you will want to install the new exhibit, the Kinect Enabled Gigapixel exhibit. To install this, just run the KinectGigaPixel.AIR file located in the "air" folder of the project. This will automatically install the entire project for you.
For one, I feel I should point out that this package is actually using the GigapixelElement, which you'll see in the CML. The difference between an Element and a Viewer is that Elements are primarily one item, that do one thing. Viewers use elements, and commonly wrap them up in a frame, with info and close buttons, and allow them to be manipulated about the entire stage. You can have multiple elements in a viewer, you can have multiple viewers on stage, and you can have multiple elements on stage as well, but the elements will likely be harder to interact with without being wrapped in some sort of container or viewer.
To run the project, make sure your Contour program that you installed earlier is running, then go to "<Installation Directory>/bin/KinectGigaPixel.swf" and run that file. The application should run full screen and you'll end up with a massive image that you can then float through using motion gestures in front of the Kinect. If it seems awkward at first, our third tutorial will go over understanding the experience and setting up your Kinect space.
If you can see your gigapixel image, that's great, but in this amazing package we included not just one, but two, two gigapixel images! But wait, how do you see the second one?
Well, if you're new to this, I'm going to introduce you to CML, which is very much like XML. If you're not new to this, this will be a helpful refresher. If you bothered to look at the Main.as file, you'll notice there's just not a lot there, that's because the OpenExhibits libraries handle mostly everything. What you want to do is take a look at the .cml file, which you can find in your "KinectGigaPixel/bin/library/cml/" folder, titled "GigapixelElement.cml", appropriately enough. You'll want to open that up in your favorite .xml editor, such as Notepad++.
CML (Creative Markup Language) is being developed for OpenExhibits as a way to easily lay out an exhibit, or application using our libraries to create complete, custom exhibits. When you open up the CML file, you'll find various things in tags using angle brackets that look somewhat like <this />, and these things can actually be combined in used in various ways to create custom displays, but like I said earlier, all you need right now is the <GigapixelElement/> tag. Within the brackets of your <GigapixelElement/> tag, there's an attribute called "src", this is the file that the GigapixelElement is looking up to find all its images to create the gigapixel image that you see. Right now the file it's set to should end in "space.xml".

- If your tag does not include "class", or "id", that's all right, those are optional.
So with your CML still open so you can edit, navigate to your "KinectGigaPixel/bin/library/assets/deepzoom/" folder. You should notice two folders, and two XML files. The folders are where the images that are linked to the appropriate XML files are. You don't need to edit these, you just need to learn where these files are and where they go in case you decide to make your own. Here, you should be able to see your "space.xml" file that's filling out the "src" tag in your CML. Now you can change that attribute in your CML tag to the other file in the folder, "wise2012-003-b.xml". Leave the rest of the folder branch in the filename, however, so it should look like this: "library/assets/deepzoom/wise2012-003-b.xml". Now if you go back and run your program again, you should have a completely different panorama.
Now, this is great, and this information is also very useful if you're using the normal GigapixelElement or Viewer without the Kinect. You can also customize the program to display your own gigapixel images that you create, but what if you don't know how to make them? That's all right, I give a rundown in the second part of this tutorial on how to use Deep Zoom Composer to create your own gigapixel images out of large, high res images, or combinations of smaller images. In the third part, I'll give you a complete rundown of how to set up the physical space around your Kinect and how to interact with it to view the Gigapixel images.
Ideum and Open Exhibits at ISEA 2012
Next week, the ISEA2012 international symposium kicks off. We will be there demoing the latest Open Exhibits software on one of our Platform multitouch tables on Thursday, September 19th at the Meeting Minds Tech Lounge at the Hotel Albuquerque Reception (5:30-7pm).
There's more about ISEA2012 below:

"ISEA2012 Albuquerque: Machine Wilderness is a symposium and series of events exploring the discourse of global proportions on the subject of art, technology and nature. The ISEA symposium is held every year in a different location around the world, and has a 30-year history of significant acclaim. Albuquerque is the first host city in the U.S. in six years."
"Machine Wilderness references the New Mexico region as an area of rapid growth and technology alongside wide expanses of open land, and aims to present artists' and technologists' ideas for a more humane interaction between technology and wilderness in which "machines" can take many forms to support life on Earth."
Learn more on the ISEA2012 website
(Cross-posted from Ideum blog)
More opportunities to provide feedback
Thanks for your interest and participation in the Open Exhibits community. With exciting new changes and additions in the works, the Open Exhibits team is again seeking to get feedback, better understand people's use of the Open Exhibits resources, and to gauge levels of interest and need for new resources.
To respond, you can use the link provided in the email sent this past week or:
Click here to take the survey (survey no longer online)
The survey will take approximately 5-7 minutes of your time to complete - and as always we are incentivizing response with a few prizes.
Please feel free to contact me if you have any questions.
Thanks and best wishes,
Jennifer Borland
External Evaluator for Open Exhibits